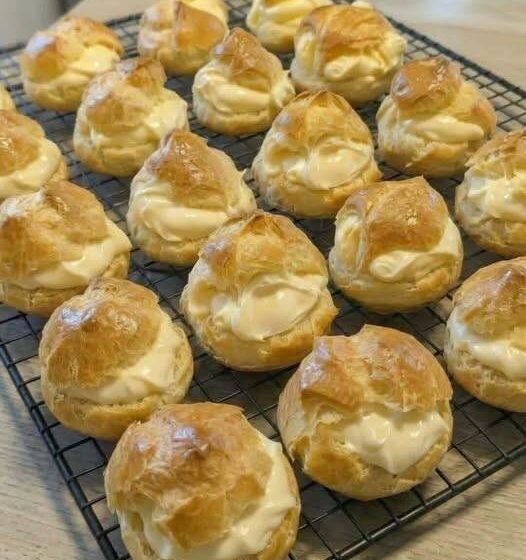
Light, airy pastry shells filled with a creamy vanilla filling—these homemade cream puffs are an old-fashioned dessert that feels special without being difficult to make.
There is something wonderfully nostalgic about homemade cream puffs. The pastry shells are crisp and golden on the outside, wonderfully light inside, and just begging to be filled with something creamy and sweet.
This recipe uses a classic pâte à choux pastry, made from butter, water, flour, and eggs. The shells bake up hollow, making them perfect for a simple vanilla cream filling. A similar version of this recipe combines butter, water, vanilla, flour, and eggs for the pastry, then fills the baked puffs with whipped cream and instant vanilla pudding for an easy, stable filling.
Why You’ll Love These Homemade Cream Puffs
- Light and airy: The pastry shells puff beautifully in the oven.
- Creamy filling: The vanilla filling is rich, fluffy, and smooth.
- Simple ingredients: No complicated pastry ingredients are needed.
- Beautiful presentation: They look like something from a bakery.
- Perfect for celebrations: Wonderful for holidays, showers, birthdays, and family gatherings.
- Make-ahead friendly: The shells can be baked ahead of time.
- Easy to customize: Add chocolate, berries, caramel, or powdered sugar.
Ingredients
For the Cream Puff Shells
- ½ cup unsalted butter
- 1 cup water
- 1 teaspoon vanilla extract
- 1 cup all-purpose flour
- 4 large eggs
For the Cream Filling
- 2 cups heavy whipping cream
- 1 package (3.4 oz) instant vanilla pudding mix
- ⅓ cup milk
For Finishing
- Powdered sugar, optional
- Melted chocolate, optional
- Chocolate sauce, optional
- Fresh berries, optional
How to Make Mom’s Homemade Cream Puffs
1. Prepare the Oven
Preheat your oven to 400°F (200°C).
Line one or two baking sheets with parchment paper.
Having the baking sheets ready before making the dough makes the process easier because the pastry dough should be piped or portioned while it is still fresh.
2. Make the Choux Pastry
Add the butter, water, and vanilla to a medium saucepan.
Place the saucepan over medium heat and bring the mixture to a gentle boil.
Once the butter has completely melted and the liquid is bubbling, add the flour all at once.
Immediately begin stirring vigorously with a wooden spoon or sturdy spatula.
The mixture will initially look lumpy, but keep stirring until it comes together into a smooth dough.
Continue cooking and stirring for another 1–2 minutes, until the dough pulls away from the sides of the pan and forms a ball.
3. Cool the Dough Slightly
Remove the saucepan from the heat.
Let the dough cool for about 5 minutes.
This step is important because adding the eggs while the dough is extremely hot can cause them to begin cooking.
4. Add the Eggs
Add the eggs one at a time, mixing thoroughly after each addition.
At first, the dough may look separated or slippery. Don’t worry—that is normal.
Continue mixing until each egg is completely incorporated before adding the next one.
When finished, the dough should be smooth, glossy, thick, and soft enough to pipe or scoop.
The eggs provide much of the moisture that turns into steam in the oven, helping the pastry expand and form its characteristic hollow center.
5. Shape the Cream Puffs
You can use a piping bag fitted with a large round tip or simply use a spoon.
Pipe or scoop the dough into small mounds on the prepared baking sheet, leaving about 2 inches of space between them.
If using a spoon, gently smooth any sharp peaks with a damp fingertip.
Try to keep the puffs similar in size so they finish baking at approximately the same time.
6. Bake
Place the baking sheet in the preheated oven.
Bake for approximately 30–40 minutes, depending on their size, until the cream puffs are deeply golden brown and feel firm.
Avoid opening the oven door during the early part of baking. A sudden loss of heat can cause the pastries to collapse.
7. Release the Steam
Once the puffs are beautifully golden, remove them from the oven.
Use a small knife or toothpick to make a tiny hole in the side of each puff.
This allows trapped steam to escape.
Return the puffs to the turned-off oven for about 5–10 minutes, with the oven door slightly open.
Then transfer them to a wire rack and let them cool completely.
This extra step helps keep the shells from becoming soggy or collapsing as they cool.
Make the Creamy Vanilla Filling
While the pastry shells cool, prepare the filling.
Add the heavy whipping cream, instant vanilla pudding mix, and milk to a large mixing bowl.
Beat with an electric mixer until the mixture becomes thick, fluffy, and creamy.
Don’t overbeat once the filling has reached a firm, spreadable consistency.
The pudding mix helps stabilize the whipped cream, creating a filling that is creamy but sturdy enough to hold inside the pastry shells.
Fill the Cream Puffs
Once the pastry shells are completely cool, cut them horizontally with a serrated knife.
Spoon or pipe a generous amount of vanilla cream onto the bottom half.
Place the top half back over the filling.
For a more elegant presentation, use a piping bag to create a neat swirl of cream.
Repeat with the remaining cream puffs.
Add a Beautiful Finishing Touch
The easiest way to finish these cream puffs is with a generous dusting of powdered sugar.
For a more decadent dessert, drizzle the tops with melted chocolate.
You can also add:
- Chocolate ganache
- Caramel sauce
- Fresh strawberries
- Raspberries
- Blueberries
- Chopped toasted nuts
- White chocolate drizzle
Tips for Perfect Cream Puffs
Don’t Skip the Cooking of the Flour
When you add the flour to the boiling butter and water, keep stirring and cooking the mixture until it forms a smooth ball. This develops the structure needed for the pastry.
Don’t Add the Eggs Too Quickly
Let the dough cool for a few minutes before adding the eggs. Add them one at a time and mix thoroughly.
Don’t Make the Puffs Too Large
Large cream puffs can be difficult to bake completely in the center. Medium-sized puffs are easier to bake evenly.
Keep the Oven Door Closed
The rising pastry needs consistent heat. Opening the door too early can cause the puffs to collapse.
Bake Until Deeply Golden
Cream puffs that are pale may still contain too much moisture inside. A deep golden color usually indicates that the shell has developed enough structure.
Cool Completely Before Filling
Warm pastry will melt the filling and can make the shells soggy.
Delicious Variations
Chocolate Cream Puffs
Add a drizzle of melted semi-sweet chocolate over the finished cream puffs.
Strawberry Cream Puffs
Fold finely diced fresh strawberries into the vanilla cream or serve sliced strawberries alongside the filled pastries.
Chocolate Cream Filling
Replace the vanilla pudding with chocolate instant pudding for a rich chocolate version.
Lemon Cream Puffs
Add 1–2 teaspoons of fresh lemon zest and a tablespoon of lemon juice to the cream filling.
Caramel Cream Puffs
Drizzle caramel sauce over the finished pastries and sprinkle lightly with flaky sea salt.
Nutella Cream Puffs
Add a few tablespoons of chocolate-hazelnut spread to the prepared vanilla filling.
Make-Ahead Instructions
The pastry shells can be baked 1 day ahead.
Once completely cool, store them in an airtight container at room temperature.
Prepare the filling separately and refrigerate it.
For the best texture, fill the cream puffs shortly before serving. This helps preserve the crispness of the pastry shell.
You can also freeze unfilled baked shells. Allow them to cool completely, place them in a freezer-safe container, and freeze.
Thaw them at room temperature and, if necessary, warm them briefly in a low oven to refresh their texture before filling.
How to Store Cream Puffs
Filled cream puffs should be stored in the refrigerator because the cream filling contains dairy.
They are best enjoyed within 1–2 days after filling.
For the best texture, keep the shells and filling separate whenever possible and assemble them shortly before serving.
Frequently Asked Questions
Why did my cream puffs collapse?
They may have been underbaked or still contained too much moisture. Make sure the shells are deeply golden and firm before removing them from the oven. Poking a small hole after baking also helps release excess steam.
Can I make cream puffs without a piping bag?
Absolutely. Use two spoons to scoop the dough into small mounds. The finished puffs may be slightly less uniform, but they’ll taste just as good.
Can I fill cream puffs with regular whipped cream?
Yes. Plain sweetened whipped cream works beautifully. The pudding-based filling simply provides a little more stability.
Can I make the shells ahead of time?
Yes. The shells can be baked ahead and stored airtight. Fill them closer to serving time for the best texture.
Why aren’t my cream puffs hollow?
The pastry may not have baked long enough, or the dough may have contained too much moisture. Make sure you cook the flour mixture properly and bake the puffs until they are thoroughly golden and firm.
Final Thoughts
Mom’s Homemade Cream Puffs are the kind of dessert that makes an ordinary day feel like a special occasion. The golden pastry shells are light and delicate, while the creamy vanilla filling makes every bite rich and satisfying.
Whether you’re making them for a holiday dessert table, afternoon coffee, a birthday celebration, or simply because you’re craving something homemade, these classic cream puffs are sure to disappear quickly.
Finish them with powdered sugar for a simple homemade touch or add chocolate and fresh berries when you want something extra special. Once you master the choux pastry, you’ll have a versatile recipe you can return to again and again.