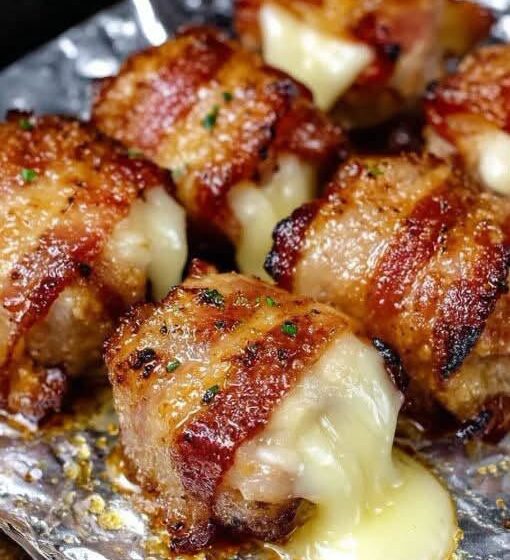
Juicy, cheesy bites wrapped in crispy bacon and baked until golden, smoky, and irresistibly delicious.
Bacon-Wrapped Cheese Bombs are the ultimate crowd-pleasing appetizer. Each bite combines savory seasoned meat, gooey melted cheese, and crispy bacon for a snack that’s packed with flavor.
They’re perfect for game days, backyard gatherings, parties, potlucks, or whenever you’re craving something indulgent. The best part? They’re surprisingly easy to prepare and can be assembled ahead of time.
Why You’ll Love These Bacon-Wrapped Cheese Bombs
- 🥓 Crispy, smoky bacon surrounds every bite
- 🧀 Gooey melted cheese in the center
- 🥩 Savory seasoned meat makes them hearty
- 🎉 Perfect for parties and game days
- 🔥 Delicious straight from the oven
- ⏱️ Easy to prepare ahead of time
- 🍴 Great with dipping sauces
Ingredients
- 1 pound ground beef
- 8 slices bacon, cut in half
- 4 oz cream cheese, softened
- 1 cup shredded sharp cheddar cheese
- ½ small onion, finely diced
- 2 cloves garlic, minced
- 1 tablespoon Worcestershire sauce
- ½ teaspoon smoked paprika
- ½ teaspoon garlic powder
- ½ teaspoon onion powder
- ½ teaspoon salt
- ¼ teaspoon black pepper
- 1 tablespoon chopped fresh parsley, optional
- Toothpicks, as needed
For Serving
- Ranch dressing
- BBQ sauce
- Honey mustard
- Spicy ketchup
- Burger sauce
How to Make Bacon-Wrapped Cheese Bombs
1. Prepare the Cheese Filling
In a small bowl, combine the softened cream cheese and shredded cheddar.
Mix until well combined.
Form the cheese mixture into approximately 12 small balls, about 1 teaspoon each.
Place them on a plate and refrigerate while preparing the meat.
Chilling the cheese makes it easier to wrap and helps prevent it from escaping too quickly during baking.
2. Prepare the Meat Mixture
Place the ground beef in a large bowl.
Add the diced onion, minced garlic, Worcestershire sauce, smoked paprika, garlic powder, onion powder, salt, black pepper, and parsley if using.
Mix gently until everything is evenly incorporated.
Avoid overmixing, which can make the meat tough.
3. Form the Cheese Bombs
Divide the meat mixture into approximately 12 equal portions.
Take one portion and flatten it into a small disk.
Place a chilled cheese ball in the center.
Carefully fold the meat around the cheese, completely enclosing it.
Roll gently between your hands to create a smooth ball.
Make sure there are no cracks or exposed cheese.
Repeat with the remaining meat and cheese.
4. Wrap With Bacon
Take half a slice of bacon and wrap it around one meatball.
Secure it with a toothpick if necessary.
If your bacon slices are particularly thin, you may need slightly more bacon to completely cover each bomb.
Place the bacon-wrapped cheese bombs seam-side down on a parchment-lined or lightly greased baking sheet.
For easier cleanup, place a wire rack over the baking sheet and arrange the bombs on the rack. This allows excess bacon fat to drip away while the bacon crisps.
5. Bake
Preheat your oven to 400°F (200°C).
Bake the cheese bombs for approximately 20–25 minutes, turning them once halfway through if they’re sitting directly on the baking sheet.
The bacon should become browned and crispy, and the beef should reach an internal temperature of 160°F (71°C).
For extra-crispy bacon, place them under the broiler for 1–2 minutes at the end.
Watch carefully because bacon can go from golden to burnt quickly.
6. Rest and Serve
Remove the cheese bombs from the oven and let them rest for approximately 5 minutes.
Carefully remove the toothpicks before serving, or leave them in place if you’re serving them as finger food and clearly alert guests.
Serve warm with your favorite dipping sauces.
Tips for the Best Bacon-Wrapped Cheese Bombs
Keep the Cheese Cold
Chilled cheese stays inside the meat better during baking.
If the cheese becomes soft while you’re assembling the bombs, return it to the refrigerator for 10–15 minutes.
Seal the Meat Completely
This is one of the most important steps.
Make sure the meat completely surrounds the cheese. Even a small opening can allow melted cheese to escape.
Don’t Use Extremely Thick Bacon
Very thick bacon may not become crisp before the beef is fully cooked. Regular-cut bacon generally works best.
Use a Wire Rack
A wire rack allows hot air to circulate around the bacon and lets excess grease drip away.
Don’t Overcrowd the Pan
Leave a little space between each cheese bomb so they brown more evenly.
Delicious Variations
Jalapeño Popper Cheese Bombs
Add 1 finely chopped jalapeño to the cream cheese filling.
For extra heat, leave some of the seeds in the jalapeño.
BBQ Bacon Cheese Bombs
Add 1 tablespoon BBQ sauce to the meat mixture and brush the finished bombs with additional BBQ sauce during the final few minutes of baking.
Pepper Jack Version
Replace the cheddar with shredded Pepper Jack cheese for a spicy, creamy center.
Mushroom Swiss
Sauté finely chopped mushrooms in butter until golden, allow them to cool, and mix them with Swiss cheese for the filling.
Pizza Cheese Bombs
Use mozzarella in the center and add Italian seasoning to the meat mixture.
Serve with warm marinara sauce for dipping.
Breakfast Cheese Bombs
Use breakfast sausage instead of ground beef and fill the center with cheddar and cream cheese.
They’re excellent served alongside scrambled eggs.
What to Serve With Bacon-Wrapped Cheese Bombs
These little bites are rich and savory, so they’re especially good with fresh or tangy sides.
Serve them with:
- Ranch dressing
- BBQ sauce
- Honey mustard
- Pickles
- Coleslaw
- Potato wedges
- Fresh vegetable sticks
- Potato salad
- Macaroni salad
- Simple green salad
For a party platter, arrange the cheese bombs alongside several dipping sauces so everyone can choose their favorite.
Make-Ahead Instructions
Bacon-Wrapped Cheese Bombs are excellent for entertaining because you can assemble them ahead of time.
Prepare the cheese centers and meatballs, wrap them with bacon, and place them on a covered baking sheet.
Refrigerate for up to 24 hours before baking.
When ready to cook, take them out of the refrigerator while the oven preheats, then bake as directed.
You can also freeze the assembled, uncooked cheese bombs. Place them on a tray and freeze until solid, then transfer them to a freezer-safe container.
Thaw them in the refrigerator before baking.
Storage
Store leftover cheese bombs in an airtight container in the refrigerator for up to 3–4 days.
Reheat them in a 375°F oven for approximately 8–12 minutes, or until heated through.
An air fryer also works particularly well for reheating because it helps restore the bacon’s crispness.
Avoid overheating them in the microwave for too long, as the bacon can become soft and the cheese can separate.
Frequently Asked Questions
Can I use ground turkey instead of beef?
Yes. Ground turkey can be substituted, although the flavor will be lighter. Make sure the center reaches 165°F (74°C) for ground poultry.
Can I use only cheddar instead of cream cheese?
Absolutely. You can use small cubes of cheddar, mozzarella, or another firm melting cheese in the center.
Why did my cheese leak out?
The meat may not have completely sealed around the cheese, or the cheese may have been too warm before baking. Chill the filling and carefully seal every meatball.
Can I make these in an air fryer?
Yes. Arrange the bacon-wrapped cheese bombs in a single layer and cook at approximately 375°F (190°C) until the bacon is crisp and the beef reaches 160°F. Cooking times vary depending on the air fryer and size of the meatballs.
Can I use chicken?
Yes, but because ground chicken requires a higher safe internal temperature, cook the cheese bombs until they reach 165°F (74°C).
Final Thoughts
Bacon-Wrapped Cheese Bombs are everything you want in a party appetizer: crispy bacon, juicy seasoned meat, and a warm, gooey cheese center.
They’re easy enough for a casual family snack but impressive enough for game-day parties and gatherings. Make them spicy with jalapeños, smoky with BBQ sauce, or classic with cheddar and ranch.
Just be sure to make plenty—once that first batch hits the table, these cheesy little bites tend to disappear fast!

