Crisp, buttery cookie sticks filled with smooth, rich chocolate — an old-fashioned homemade treat perfect for afternoon coffee, dessert platters, or sharing with family.
These Chocolate Sticks combine a tender, lightly sweetened cookie dough with a creamy chocolate filling. Each stick is baked until lightly golden, creating a delicious contrast between the delicate pastry and the smooth chocolate center.
They’re easier to make than they look, and the dough can be prepared ahead of time to make baking day even simpler. Enjoy them with coffee, tea, or a cold glass of milk, or dip the ends in melted chocolate for an extra-special finish.
Why You’ll Love This Recipe
- Buttery and chocolatey: A tender cookie exterior surrounds a rich chocolate filling.
- Perfect for sharing: The stick shape makes these treats easy to serve at parties and family gatherings.
- Make-ahead friendly: Chilling the dough helps make shaping easier.
- Customizable: Use semisweet, dark, or milk chocolate to suit your taste.
- Beautiful presentation: A dusting of powdered sugar or a chocolate-dipped tip makes them look bakery-worthy.
Ingredients
Prep time: 25 minutes · Chill time: 20–30 minutes · Cook time: 12–15 minutes · Makes: approximately 18–24 sticks, depending on size
For the cookie dough
- 1 cup (226 g) unsalted butter, softened
- 1 cup (200 g) granulated sugar
- 1 large egg
- 1 teaspoon vanilla extract
- 2 cups (250 g) all-purpose flour
- ½ teaspoon baking powder
- ¼ teaspoon salt
For the chocolate filling
- 1 cup (170 g) semisweet chocolate chips
- 2 tablespoons (28 g) butter
- ¼ cup (60 g) sweetened condensed milk
- 1 teaspoon vanilla extract
Optional topping
- Powdered sugar, for dusting
- ¼ cup melted chocolate, for dipping or drizzling
- Finely chopped nuts, for extra crunch
Instructions
Step 1: Prepare the cookie dough
In a large mixing bowl, beat the softened butter and granulated sugar until creamy and smooth, about 2–3 minutes.
Add the egg and vanilla extract, then mix until fully incorporated.
In a separate bowl, whisk together the flour, baking powder, and salt. Gradually add the dry ingredients to the butter mixture, stirring until a soft dough forms. Avoid overmixing, as this can make the finished cookies tough.
Cover the dough and refrigerate for 20–30 minutes to make it easier to roll and shape.
Step 2: Make the chocolate filling
Place the chocolate chips, butter, and sweetened condensed milk in a small saucepan.
Warm over low heat, stirring continuously until the chocolate melts and the mixture becomes smooth. Remove from the heat and stir in the vanilla extract.
Let the filling cool slightly until it is thick enough to spread without running. If it becomes too firm, warm it gently for a few seconds while stirring.
Step 3: Preheat the oven
Preheat your oven to 350°F (180°C). Line a baking sheet with parchment paper.
Lightly flour your work surface and rolling pin to prevent the dough from sticking.
Step 4: Roll and shape the sticks
Divide the chilled dough into manageable portions. Roll each portion into a rectangle approximately ¼ inch thick.
Cut the dough into long strips about 1 inch wide. Spoon or pipe a thin line of chocolate filling down the center of each strip, leaving the edges clear.
Carefully fold the dough edges over the filling and pinch them together to seal. Gently shape each piece into a long stick, then place it seam-side down on the prepared baking sheet.
Leave a little space between the sticks so they can bake evenly.
Step 5: Bake until lightly golden
Bake for 12–15 minutes, or until the dough is set and the edges are lightly golden. Thicker sticks may need a little longer.
Keep an eye on the bottoms, as they can brown before the tops appear fully golden.
Remove the baking sheet from the oven and let the sticks rest for a few minutes before transferring them to a wire rack. Allow them to cool completely before adding any chocolate coating or powdered sugar.
Step 6: Decorate and serve
Dust the cooled chocolate sticks with powdered sugar for a simple finish.
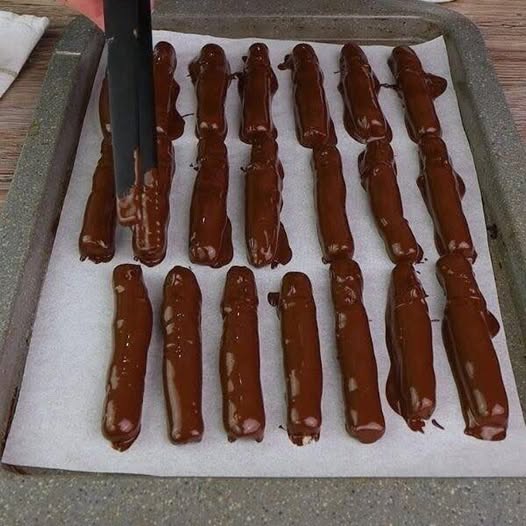
For an extra chocolatey treat, dip one end of each stick into melted chocolate and place it on parchment paper until set. You can also drizzle melted chocolate over the tops or sprinkle on chopped nuts while the coating is still wet.
Serve with coffee, tea, or milk and enjoy!
Tips for the Best Chocolate Sticks
- Chill the dough: Cold dough is easier to handle and helps the sticks hold their shape.
- Don’t overfill: Too much chocolate can leak from the seams during baking.
- Seal the edges well: Pinch the dough firmly around the filling to keep it inside.
- Use low heat for the filling: Gentle heating helps prevent the chocolate from scorching or becoming grainy.
- Cool before decorating: Warm cookies can melt the chocolate coating and make the finish messy.
- Make evenly sized sticks: Similar thicknesses help the cookies bake at the same rate.
Delicious Variations
Dark Chocolate Sticks: Replace the semisweet chocolate with dark chocolate for a deeper, less-sweet flavor.
Chocolate Hazelnut Sticks: Add a small amount of hazelnut spread to the filling for a nutty twist.
Chocolate Almond Sticks: Sprinkle finely chopped almonds over the filling before sealing the dough.
Orange Chocolate Sticks: Add a little finely grated orange zest to the chocolate filling for a bright citrus note.
Double Chocolate Sticks: Dip the cooled sticks in melted chocolate and finish with a light drizzle of white chocolate.
What to Serve with Chocolate Sticks
These homemade treats pair beautifully with:
- Hot coffee or espresso
- Black tea or chai
- A cold glass of milk
- Hot chocolate for a chocolate-themed dessert
- Fresh strawberries or raspberries
- A scoop of vanilla ice cream for a more indulgent dessert
Make-Ahead and Storage
Make ahead: Prepare the cookie dough up to one day in advance and keep it covered in the refrigerator. Let it soften slightly if it becomes too firm to roll.
Room-temperature storage: Once completely cool, store the sticks in an airtight container for up to 5 days for the best texture.
Refrigeration: If your kitchen is warm or the chocolate coating is soft, refrigerate the cookies in a sealed container. Allow them to sit briefly at room temperature before serving.
Freezing: Freeze the baked, undecorated sticks in a freezer-safe container for up to 2 months. Thaw at room temperature, then decorate if desired.
Frequently Asked Questions
Why did my chocolate filling leak out?
The filling may have been too warm or too thin, or the dough may not have been sealed properly. Let the filling thicken before shaping, use a narrow line of chocolate, and pinch the dough edges firmly together.
Can I use store-bought chocolate spread?
Yes. A thick chocolate-hazelnut spread can replace the homemade filling. Use a small amount in each stick to prevent leakage.
Can I make these without sweetened condensed milk?
Yes. You can use a thicker chocolate filling made with melted chocolate and a small amount of butter. The texture will be slightly different, so allow the filling to cool until spreadable before shaping.
How do I know when the sticks are done?
The dough should look set, with lightly golden edges and bottoms. Avoid waiting for the entire surface to become deeply brown, as that can make the cookies dry.
Can I make the dough ahead of time?
Yes. Refrigerate it in a covered container for up to 24 hours. If it becomes very firm, leave it at room temperature briefly before rolling.
Recipe at a Glance
| Detail | Information |
|---|---|
| Prep time | 25 minutes |
| Chill time | 20–30 minutes |
| Cook time | 12–15 minutes per batch |
| Total time | Approximately 1 hour |
| Yield | 18–24 sticks |
| Oven temperature | 350°F (180°C) |
| Difficulty | Easy to moderate |
| Main flavors | Buttery cookie and rich chocolate |
Final Thoughts
Chocolate Sticks are a delightful homemade treat that brings together buttery cookie dough and a smooth chocolate center in every bite. They’re ideal for afternoon tea, dessert trays, homemade gifts, or whenever you’re craving something sweet.
With a little chilling, careful shaping, and a simple chocolate filling, you can create an attractive batch of cookies that tastes just as good as it looks. Try your favorite chocolate variation, add a decorative drizzle, and keep a few aside to enjoy with your next cup of coffee.