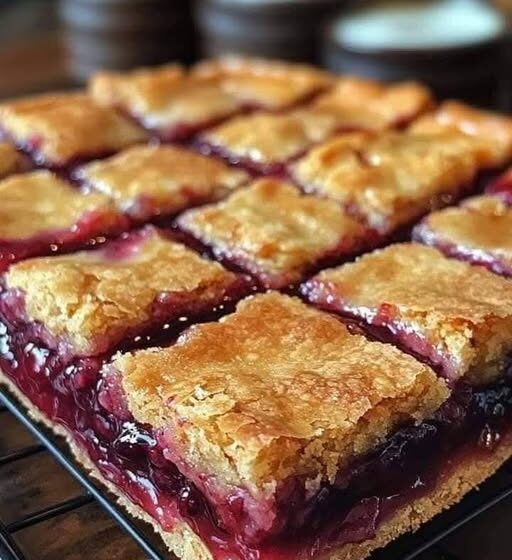
Buttery, tender dessert bars layered with sweet cherry pie filling and finished with a simple vanilla glaze—everything you love about cherry pie without the fuss of making a traditional pie crust.
If you love cherry pie but don’t always want to make a full pie, these Cherry Pie Bars are the perfect solution. They have a soft, buttery crust, a generous layer of sweet cherry filling, and a delicate glaze that makes every bite taste like a slice of homemade cherry pie.
Instead of rolling and crimping pie dough, you’ll make one simple batter and use it for both the bottom and the top. The result is an easy dessert that’s ideal for family dinners, potlucks, holidays, bake sales, and afternoon coffee. Similar cherry bar recipes use this same simple combination of butter, sugar, eggs, flour, cherry pie filling, and a sweet glaze.
Why You’ll Love These Cherry Pie Bars
- Easy to make: No rolling, chilling, or shaping pie dough.
- Buttery and tender: The soft cake-like crust pairs beautifully with the cherries.
- Sweet and fruity: Cherry pie filling gives you plenty of juicy cherry flavor.
- Beautiful presentation: A simple glaze makes the bars look bakery-worthy.
- Perfect for sharing: Cut them into small squares for parties and gatherings.
- Make-ahead friendly: They can be prepared in advance and stored for several days.
Ingredients You’ll Need
For the Cherry Pie Bars
- 1 cup unsalted butter, softened
- 2 cups granulated sugar
- 1 teaspoon salt
- 4 large eggs, room temperature
- 1 teaspoon vanilla extract
- ¼ teaspoon almond extract
- 3 cups all-purpose flour
- 1 can (21 ounces) cherry pie filling
For the Glaze
- 1 cup powdered sugar
- ½ teaspoon vanilla extract
- ½ teaspoon almond extract
- 2 tablespoons milk
Optional: Add a little extra milk if you prefer a thinner drizzle.
Almond extract is especially nice with cherries because it gives the dessert a subtle almond-cherry flavor, but you can replace it with additional vanilla extract if you prefer.
How to Make Cherry Pie Bars
1. Prepare the Oven and Pan
Preheat your oven to 350°F (175°C).
Grease a 9×13-inch baking pan with nonstick spray or butter. For easier removal and cleaner slices, you can also line the pan with parchment paper, leaving some overhang on the sides.
2. Make the Batter
Place the softened butter, granulated sugar, and salt in a large mixing bowl.
Beat with a hand mixer or stand mixer until the mixture becomes light and creamy.
Add the eggs one at a time, mixing well after each addition. Stir in the vanilla and almond extracts.
Gradually add the flour and mix just until everything is combined. Don’t overmix the batter.
The mixture will be fairly thick and sticky. That’s exactly what you want.
3. Create the Bottom Layer
Spread approximately ¾ of the batter evenly across the bottom of the prepared baking pan.
If the batter sticks to your spatula, lightly spray the spatula with cooking spray or use slightly damp fingers to help spread it.
Try to create an even layer all the way to the edges.
4. Add the Cherry Filling
Spoon the cherry pie filling over the batter.
Spread it gently into an even layer, leaving a small border around the edges if possible.
The bright red cherry layer is what gives these bars their beautiful color and classic pie flavor.
5. Add the Top Layer
Drop spoonfuls of the remaining batter over the cherry filling.
You don’t need to completely cover every bit of the cherries. Leaving some small gaps allows the cherry filling to peek through as the bars bake.
This spoonful method is commonly used in cherry pie bar recipes and makes the dessert much easier than working with a traditional pie crust.
6. Bake
Place the pan in the preheated oven and bake for approximately 30–35 minutes.
The top should look lightly golden and set.
Avoid overbaking, because you want the bars to remain soft and tender.
7. Cool Completely
Remove the pan from the oven and place it on a wire rack.
Allow the bars to cool completely before glazing and cutting. Cooling is important because the cherry filling becomes easier to handle as it sets.
8. Make the Glaze
While the bars cool, whisk together:
- 1 cup powdered sugar
- ½ teaspoon vanilla extract
- ½ teaspoon almond extract
- 2 tablespoons milk
Whisk until smooth.
If the glaze is too thick, add milk a few drops at a time. If it’s too thin, add a little more powdered sugar.
9. Glaze and Slice
Drizzle the glaze over the completely cooled cherry bars.
Let the glaze sit for several minutes to set.
Use a sharp knife to cut the dessert into squares or rectangles.
For especially clean slices, chill the bars briefly before cutting.
Tips for the Best Cherry Pie Bars
Use softened butter
The butter should be soft enough to beat easily but shouldn’t be melted. Properly softened butter helps create the right texture.
Don’t overmix the batter
Once the flour is incorporated, stop mixing. Overmixing can make the bars heavier than necessary.
Don’t drain the cherry filling
Use the cherry pie filling directly from the can. Its thick, sweet consistency is designed to work as the filling for this type of dessert.
Let the bars cool
It can be tempting to cut them while they’re still warm, but the filling needs time to settle. Cooling completely will give you much cleaner bars.
Use almond extract for extra cherry flavor
Vanilla works beautifully, but a small amount of almond extract gives the cherries an especially delicious flavor.
Make the layers even
Try to spread the bottom batter evenly so that every piece has a good balance of crust and cherry filling.
Delicious Variations
Lemon Cherry Pie Bars
Add 1 teaspoon of fresh lemon zest to the batter and replace a little of the milk in the glaze with fresh lemon juice.
Chocolate Cherry Bars
Add ½ cup mini chocolate chips to the batter before assembling the bars.
Almond Cherry Bars
Add ½ cup sliced almonds to the top before baking and use almond extract in the glaze.
Mixed Berry Bars
Replace the cherry filling with blueberry, strawberry, raspberry, or another favorite fruit filling. Fruit-filled bars are particularly easy to adapt using the same basic technique.
Coconut Cherry Bars
Add ½ cup shredded sweetened coconut to the batter for a tropical twist.
Streusel Cherry Bars
Instead of dropping the remaining batter over the cherries, crumble it into small pieces and scatter it over the top.
What to Serve With Cherry Pie Bars
These bars are delicious on their own, but you can make them even more special with:
- Vanilla ice cream
- Whipped cream
- Fresh cherries
- Powdered sugar
- A drizzle of extra glaze
- Vanilla or almond ice cream
- Hot coffee
- Black tea
- Cold milk
For a warm dessert, gently heat an individual bar and serve it with a scoop of vanilla ice cream.
Make-Ahead Instructions
Cherry Pie Bars are a great dessert to make ahead.
You can bake them one day in advance, allow them to cool completely, cover them, and refrigerate them. Add the glaze shortly before serving for the freshest appearance.
If you’re preparing them for a party, cut the bars ahead of time and arrange them on a serving platter just before guests arrive.
Storage
Store leftover Cherry Pie Bars in an airtight container.
- Room temperature: Up to 2–3 days in a cool environment.
- Refrigerator: About 4–5 days.
- Freezer: Freeze unglazed bars for up to 2–3 months.
For the best texture, thaw frozen bars in the refrigerator and add fresh glaze after thawing.
Frequently Asked Questions
Can I use homemade cherry pie filling?
Absolutely. Homemade cherry filling works beautifully, as long as it has a thick enough consistency to sit between the layers.
Can I use frozen cherries?
Yes, but you’ll need to cook them into a thick pie filling first. Simply adding frozen cherries directly to the batter can introduce too much liquid.
Can I make these without almond extract?
Yes. Replace the almond extract with additional vanilla extract.
Why are my bars difficult to cut?
They probably need more cooling time. Let them cool completely before slicing. You can also refrigerate them briefly to help the filling firm up.
Can I use a different pie filling?
Definitely. Blueberry, apple, peach, and strawberry fillings can all work well in similar bar recipes.
Can I freeze Cherry Pie Bars?
Yes. For the best results, freeze them without the glaze. Thaw completely and drizzle with fresh glaze before serving.
Final Thoughts
These Cherry Pie Bars are proof that you don’t need to make a complicated pie to enjoy that classic combination of buttery pastry and sweet cherries. With a simple batter, canned cherry pie filling, and a quick vanilla glaze, you can have a beautiful homemade dessert with much less effort.
They’re soft, fruity, buttery, and wonderfully easy to share. Whether you’re making them for a holiday table, a weekend family dessert, or simply because you’re craving something sweet, this is one cherry recipe worth keeping in your collection.
A little cherry filling, a buttery homemade crust, and a sweet glaze—that’s all you need for an irresistible dessert!

