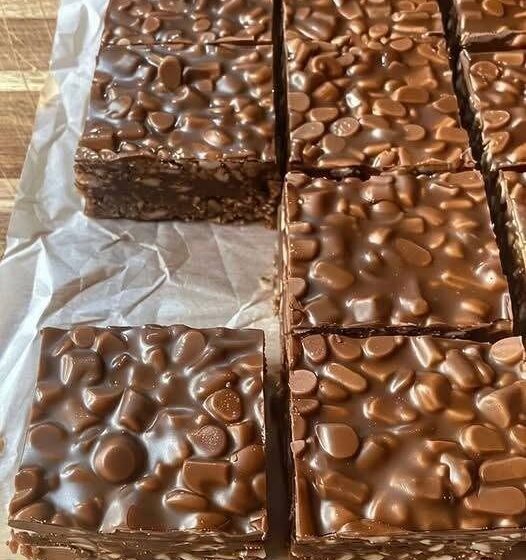
Rich, Chocolatey Dessert Bars with a Crispy Crunchy Center and a Smooth Chocolate Topping
If you love the combination of rich chocolate and irresistible crunch, these Chocolate Crunch Bars are an easy treat you’ll want to keep in your dessert rotation. A crisp, crunchy layer is combined with sweet chocolate and finished with an extra layer of smooth chocolate for a decadent homemade dessert.
They’re simple to prepare, require no complicated techniques, and are perfect for parties, lunchboxes, holiday dessert trays, or an afternoon chocolate craving.
Why You’ll Love This Recipe
- Rich chocolate flavor
- Crispy, crunchy texture
- Easy no-fuss preparation
- Simple ingredients
- No complicated decorating
- Great for parties and gatherings
- Perfect for chocolate lovers
- Easy to make ahead
- Delicious chilled or at room temperature
- Great for holiday cookie trays
Ingredients
For the Crunch Layer
- 4 cups crispy rice cereal
- 1 cup creamy peanut butter
- ½ cup honey
- ½ cup granulated sugar
- ¼ cup unsalted butter
- 1 teaspoon vanilla extract
- ¼ teaspoon salt
For the Chocolate Topping
- 2 cups semisweet chocolate chips
- 1 tablespoon coconut oil or shortening
- ½ cup milk chocolate chips, optional
Optional Toppings
- Chopped peanuts
- Mini chocolate chips
- Flaky sea salt
- Chocolate sprinkles
- Crushed pretzels
Instructions
Step 1: Prepare the Pan
Line a 9×13-inch baking pan with parchment paper.
Leave some parchment hanging over the sides so you can easily lift the finished bars from the pan.
Set aside.
Step 2: Prepare the Crunch Cereal
Place the crispy rice cereal in a large mixing bowl.
Set it aside while you prepare the sweet peanut butter mixture.
Step 3: Make the Peanut Butter Mixture
Place the peanut butter, honey, granulated sugar, and butter in a medium saucepan.
Heat over medium-low heat, stirring constantly.
Continue heating until the butter and peanut butter have melted and the mixture is smooth.
Do not allow it to boil vigorously.
Step 4: Add Vanilla
Remove the saucepan from the heat.
Stir in the vanilla extract and salt.
Mix until smooth.
Step 5: Combine With the Cereal
Pour the warm peanut butter mixture over the crispy rice cereal.
Using a large spatula, gently fold everything together until the cereal is evenly coated.
Try not to crush the cereal as you mix.
Step 6: Press Into the Pan
Transfer the mixture to the prepared baking pan.
Use a spatula, the bottom of a measuring cup, or lightly greased hands to press the mixture firmly into an even layer.
Don’t press so hard that the cereal becomes completely crushed.
Step 7: Prepare the Chocolate
Place the semisweet chocolate chips and coconut oil in a microwave-safe bowl.
Microwave in 20–30 second intervals, stirring well between each interval.
Continue until the chocolate is completely smooth and melted.
If using milk chocolate chips, stir them in until melted and smooth.
Step 8: Add the Chocolate Layer
Pour the melted chocolate over the cereal layer.
Spread it evenly with a spatula.
Make sure the entire surface is covered.
Step 9: Add Optional Toppings
While the chocolate is still melted, sprinkle the top with chopped peanuts, crushed pretzels, mini chocolate chips, or a small amount of flaky sea salt.
Step 10: Chill
Place the pan in the refrigerator for approximately 1–2 hours, or until the chocolate has completely set and the bars are firm.
Step 11: Slice
Lift the chilled bars from the pan using the parchment paper.
Place them on a cutting board.
Use a sharp knife to cut them into squares or rectangles.
For cleaner cuts, allow the bars to sit at room temperature for a few minutes before slicing.
Step 12: Serve
Arrange the Chocolate Crunch Bars on a serving platter.
Serve chilled or allow them to come to room temperature for a softer texture.
Tips for the Best Chocolate Crunch Bars
Don’t crush the cereal
Fold the mixture gently so the crispy rice cereal maintains its crunch.
Keep the heat low
When preparing the peanut butter mixture, gentle heat prevents the sugar and honey from becoming too hot and overly sticky.
Press the mixture firmly
A firmly packed base helps the bars hold together when sliced.
Melt chocolate slowly
Chocolate can burn easily. Use short microwave intervals and stir frequently.
Let the chocolate set completely
Chilling the bars until firm makes them much easier to cut cleanly.
Use parchment paper
The parchment creates easy removal and makes cleanup much simpler.
Delicious Variations
Peanut Butter Chocolate Crunch Bars
Use extra creamy peanut butter for an even richer peanut butter flavor.
Dark Chocolate Crunch Bars
Replace the semisweet chocolate with dark chocolate for a deeper, less-sweet finish.
White Chocolate Crunch Bars
Use melted white chocolate for a sweeter variation.
Nutty Chocolate Crunch Bars
Add chopped almonds, peanuts, pecans, or walnuts to the cereal mixture.
Pretzel Crunch Bars
Add crushed pretzels to the base for an extra salty crunch.
Coconut Chocolate Bars
Stir shredded coconut into the cereal mixture and finish with melted chocolate.
S’mores Crunch Bars
Add mini marshmallows and crushed graham crackers to the cereal mixture.
Salted Chocolate Crunch Bars
Finish the melted chocolate layer with a light sprinkling of flaky sea salt.
What to Serve With Chocolate Crunch Bars
These bars pair beautifully with:
- Vanilla ice cream
- Whipped cream
- Fresh strawberries
- Raspberries
- Cold milk
- Hot coffee
- Hot chocolate
- Vanilla yogurt
- Caramel sauce
- Chocolate sauce
For a simple dessert plate, serve a bar with a scoop of vanilla ice cream and a drizzle of warm caramel sauce.
Make-Ahead Instructions
Chocolate Crunch Bars are ideal for making ahead.
Prepare the bars up to 2–3 days before serving and keep them covered in the refrigerator.
You can also freeze the finished bars for longer storage.
If making them for a party, allow them to chill completely before cutting and arranging them on a serving platter.
Storage
Store the bars in an airtight container.
Keep them refrigerated for up to 1 week.
Place parchment paper between layers to prevent the chocolate coating from sticking.
For a softer texture, allow the bars to sit at room temperature for several minutes before serving.
Freezing Instructions
Chocolate Crunch Bars freeze well.
Place the cut bars in a freezer-safe container with parchment paper between each layer.
Freeze for up to 2–3 months.
Thaw the bars in the refrigerator overnight or allow individual portions to soften at room temperature before serving.
Frequently Asked Questions
Do Chocolate Crunch Bars need to be refrigerated?
Refrigeration isn’t strictly necessary in a cool environment, but keeping them chilled helps the chocolate topping remain firm and the bars maintain their shape.
Can I use another cereal?
Yes. Crispy rice cereal gives the classic light crunch, but you can experiment with corn or wheat-based crispy cereals.
Can I make these without peanut butter?
Yes. You can substitute almond butter, sunflower seed butter, or another smooth nut or seed butter.
Why are my bars falling apart?
The cereal mixture may not have been pressed firmly enough into the pan. Make sure the sweet mixture coats the cereal evenly and press the mixture firmly into the pan.
Why is my chocolate topping too hard?
If you prefer a softer chocolate layer, adding a small amount of coconut oil or shortening helps create a smoother, slightly softer topping.
Can I use dark chocolate?
Absolutely. Dark chocolate works especially well with the sweet peanut butter crunch layer.
How do I cut the bars neatly?
Chill the bars completely, then use a sharp knife. Wiping the knife clean between cuts can also help create cleaner edges.
Perfect for Any Occasion
Chocolate Crunch Bars are perfect for:
- Birthday parties
- Holiday gatherings
- Bake sales
- Lunchbox treats
- School events
- Potlucks
- Movie nights
- Family gatherings
- Christmas cookie trays
- Homemade gifts
Cut them into small squares for parties or larger rectangles for a more substantial dessert.
Final Thoughts
Chocolate Crunch Bars are the perfect combination of rich chocolate, creamy peanut butter, and crispy cereal. They’re simple enough for an everyday treat but delicious enough to deserve a place on any holiday dessert table.
With a crunchy center and smooth chocolate topping, these bars offer plenty of texture in every bite. Make a batch ahead of time, keep them chilled, and you’ll always have an easy homemade chocolate treat ready to share.