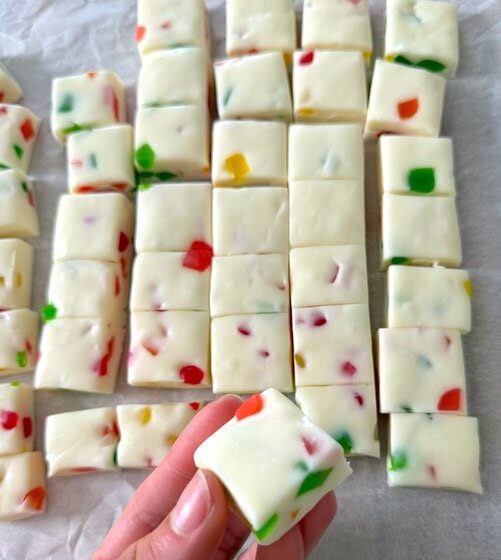
Soft, Chewy Homemade Jelly Candy with Bright Fruit Flavor and a Sweet Sugar Coating
There’s something wonderfully nostalgic about Old-Fashioned Jelly Candy. These colorful little treats have a soft, chewy texture, a bright fruity flavor, and a delicate coating of sugar that makes them look just like the candies you remember from old-fashioned candy shops.
Made with simple ingredients and your favorite fruit flavor, homemade jelly candy is a fun treat for holidays, parties, gift boxes, or whenever you’re craving something sweet and nostalgic.
Why You’ll Love This Recipe
- Soft and pleasantly chewy
- Bright fruity flavor
- Simple ingredients
- Beautiful colorful appearance
- Easy to customize
- Perfect for holiday candy trays
- Great homemade gift
- Wonderful for parties
- Can be made in different flavors
- Delicious with a sugar coating
Ingredients
For the Jelly Candy
- 1 cup fruit juice or fruit purée
- 2 tablespoons unflavored gelatin
- ½ cup granulated sugar
- ¼ cup light corn syrup
- 1 tablespoon lemon juice
- 1 teaspoon vanilla extract
- A few drops of food coloring, optional
For Coating
- ½ cup granulated sugar
- 1–2 tablespoons powdered sugar, optional
Instructions
Step 1: Prepare the Pan
Lightly grease an 8-inch square baking dish with cooking spray or a thin layer of neutral oil.
Line the bottom with parchment paper, leaving some overhang on two sides.
This will make the finished candy much easier to remove.
Step 2: Bloom the Gelatin
Pour the fruit juice into a small saucepan.
Sprinkle the unflavored gelatin evenly over the surface.
Allow it to sit for approximately 5 minutes so the gelatin can absorb the liquid and soften.
This step helps create a smooth, even texture.
Step 3: Add the Sugar
Place the saucepan over low heat.
Add the granulated sugar and stir gently until the gelatin and sugar have dissolved.
Do not allow the mixture to boil.
Step 4: Add the Corn Syrup
Stir in the light corn syrup.
Continue heating gently until the mixture is smooth and completely combined.
The syrup helps give the candy its characteristic soft and chewy texture.
Step 5: Add Lemon Juice and Vanilla
Remove the saucepan from the heat.
Stir in the lemon juice and vanilla extract.
If you’re using food coloring, add a few drops now and stir until the color is evenly distributed.
Step 6: Pour Into the Pan
Carefully pour the warm jelly mixture into the prepared baking dish.
If you notice any bubbles on the surface, gently pop them with a spoon or toothpick.
Step 7: Chill
Place the pan in the refrigerator.
Allow the jelly to set for approximately 3–4 hours, or until firm enough to cut.
For the best texture, you can also let it chill overnight.
Step 8: Remove the Jelly
Once completely set, lift the jelly from the pan using the parchment paper.
Place it on a clean cutting board.
Peel away the parchment carefully.
Step 9: Cut Into Pieces
Use a sharp knife to cut the jelly into small squares, rectangles, or other shapes.
For cleaner cuts, lightly grease the knife between cuts.
You can also use small cookie cutters to create fun shapes.
Step 10: Coat With Sugar
Place the granulated sugar in a shallow bowl.
Roll each piece of jelly candy in the sugar until lightly coated on all sides.
Shake off any excess sugar.
Step 11: Let the Candy Set
Arrange the coated candies on a parchment-lined tray.
Allow them to sit uncovered for approximately 1–2 hours.
This gives the outside a slightly firmer texture while keeping the center soft and chewy.
Step 12: Serve
Transfer the finished jelly candies to a serving dish or arrange them in small candy boxes for gifting.
Enjoy them at room temperature.
Tips for the Best Jelly Candy
Don’t boil the gelatin mixture
Excessive heat can affect the texture of gelatin. Keep the mixture warm enough to dissolve the ingredients without bringing it to a rolling boil.
Use strong-flavored juice
A flavorful fruit juice produces a more noticeable finished candy. Apple, grape, cherry, strawberry, raspberry, and orange are all delicious choices.
Let the candy set completely
Don’t rush the chilling process. The jelly needs enough time to become firm enough to cut cleanly.
Use a sharp knife
A sharp, lightly greased knife makes it much easier to cut neat pieces.
Don’t coat the candy too early
Allow the pieces to firm up slightly before coating them with sugar. This helps the coating adhere without becoming overly wet.
Adjust the size
Small bite-sized pieces are perfect for candy trays, while larger pieces make fun homemade treats for gifting.
Delicious Variations
Raspberry Jelly Candy
Use raspberry juice or purée for a bright, slightly tart candy.
Strawberry Jelly Candy
Strawberry juice or purée creates a sweet, fruity flavor and beautiful color.
Cherry Jelly Candy
Use cherry juice and a few drops of red food coloring for a classic candy-shop appearance.
Orange Jelly Candy
Use orange juice and a little orange zest for a bright citrus version.
Lemon Jelly Candy
Replace some of the fruit juice with lemon juice for a refreshing tart candy.
Grape Jelly Candy
Concord grape juice creates a deep fruity flavor and naturally vibrant color.
Mixed Berry Jelly Candy
Combine strawberry, raspberry, blueberry, or blackberry purée for a delicious mixed-fruit version.
Sour Jelly Candy
Add a little extra lemon juice and toss the finished candies in a mixture of granulated sugar and a small amount of citric acid for a tangy coating.
What to Do With Homemade Jelly Candy
These candies are perfect for:
- Holiday candy trays
- Birthday parties
- Baby showers
- Christmas gifts
- Valentine’s Day
- Easter baskets
- Party favors
- Homemade gift boxes
- Dessert tables
- Movie nights
Place several flavors together in a clear glass jar for a colorful homemade candy display.
Make-Ahead Instructions
Old-Fashioned Jelly Candy is an excellent make-ahead treat.
Prepare the candy and allow it to set completely.
Once cut and coated, store the pieces in an airtight container until you’re ready to serve them.
For the best texture, allow the candies to come to room temperature before serving.
Storage
Store the jelly candies in an airtight container at room temperature in a cool, dry place.
Place parchment paper between layers to prevent them from sticking together.
For the best texture and flavor, enjoy them within approximately 1–2 weeks.
Avoid storing them somewhere hot or humid because moisture can make the sugar coating sticky.
Frequently Asked Questions
What makes jelly candy chewy?
Gelatin gives these candies their characteristic soft and chewy texture, while sugar and corn syrup contribute sweetness and body.
Can I use fruit purée instead of juice?
Yes. Fruit purée can provide a stronger natural fruit flavor. If the purée is very thick, strain it first for a smoother candy.
Can I make these candies without food coloring?
Absolutely. Food coloring is completely optional. Many fruit juices and purées naturally provide beautiful colors.
Why is my candy too soft?
The candy may not have chilled long enough, or the gelatin-to-liquid ratio may be too low. Allow it to chill completely before cutting.
Why is the sugar coating becoming wet?
Excess moisture can dissolve the sugar coating. Let the candy pieces firm up and dry slightly before coating, and store them in a cool, dry environment.
Can I use different molds?
Yes. Small silicone molds can be used to create hearts, stars, flowers, or other fun shapes.
Can I make different flavors in one batch?
Yes. Divide the warm jelly mixture between several small bowls and flavor or color each portion differently before pouring them into separate molds.
Perfect for Homemade Gifts
One of the best things about Old-Fashioned Jelly Candy is how easily it can be turned into a thoughtful homemade gift.
Make several flavors, cut them into uniform pieces, and place them together in a decorative tin, glass jar, or small candy box.
For a beautiful presentation, use different colors and alternate them in layers.
Add a simple ribbon and homemade label, and you have a sweet gift for family, friends, teachers, neighbors, or holiday guests.
Final Thoughts
Old-Fashioned Jelly Candy is a simple, nostalgic treat that brings together sweet fruit flavor, a soft chewy texture, and a delicate sugar coating.
Whether you make strawberry, cherry, raspberry, orange, or a colorful combination of flavors, these homemade candies are fun to prepare and even more fun to share.
Make a batch for your next holiday gathering, package some as homemade gifts, or simply keep a jar on hand whenever you’re craving a little old-fashioned sweetness.

