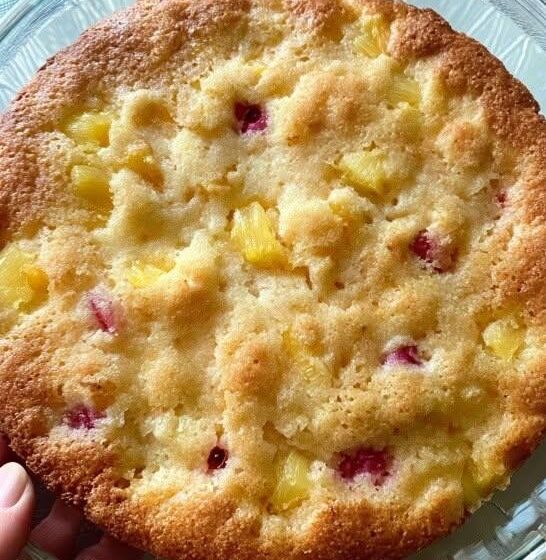
A wonderfully simple Southern fruit cake made with self-rising flour, sugar, and fruit cocktail—golden, bubbly, buttery, and delicious with vanilla ice cream.
If you love old-fashioned desserts that don’t require a long ingredient list, Cuppa Cuppa Cake is about as easy as baking gets. The name comes from the memorable recipe featured in Steel Magnolias: a “cuppa” flour, a “cuppa” sugar, and a “cuppa” fruit cocktail with its juice. The result is somewhere between a soft cake and a fruit cobbler, with a golden, buttery top and juicy fruit throughout.
The version from the linked recipe adds butter to the pan and places the remaining butter over the batter before baking. That extra butter helps create a richer flavor and beautifully golden top.
Why You’ll Love This Cake
- Only a few ingredients: No complicated shopping list.
- 5–10 minutes of prep: The batter comes together incredibly quickly.
- No mixer required: Just stir everything together.
- Sweet and fruity: Fruit cocktail adds juicy pieces of peaches, pears, cherries, and other fruit.
- Buttery golden top: Small pieces of butter melt into the batter as it bakes.
- Perfect with ice cream: Warm cake and cold vanilla ice cream make an irresistible combination.
- Great for beginners: It’s practically impossible to overcomplicate.
Ingredients
- ¼ cup unsalted butter, divided
- 1 cup self-rising flour
- 1 cup granulated sugar
- 1 can (15 oz) fruit cocktail in juice, undrained
- Vanilla ice cream or whipped cream, for serving
The linked recipe specifically calls for self-rising flour and fruit cocktail with all of its juice. The juice is important because it supplies the moisture for the simple batter.
Don’t Have Self-Rising Flour?
You can make your own.
For 1 cup self-rising flour, combine:
- 1 cup all-purpose flour
- 1½ teaspoons baking powder
- ¼ teaspoon salt
Whisk together before using.
Self-rising flour is particularly important in this recipe because the original-style batter doesn’t include a separate leavening ingredient.
How to Make Cuppa Cuppa Cake
1. Preheat the Oven
Preheat your oven to 350°F (175°C).
Generously grease a 9-inch pie dish or cake pan with some of the butter.
Don’t be shy with the butter—the recipe benefits from a well-greased pan, both for flavor and easier serving.
2. Mix the Batter
In a large mixing bowl, add:
- Self-rising flour
- Granulated sugar
- Undrained fruit cocktail
Stir gently until everything is just combined.
Do not drain the fruit cocktail.
The fruit juice is part of the recipe and provides the liquid needed to create the moist, cobbler-like texture.
Avoid overmixing. You only need to stir until there are no obvious pockets of dry flour.
3. Transfer to the Pan
Pour the batter into the generously buttered baking dish.
Spread it gently into an even layer if necessary.
The fruit may not be perfectly distributed, and that’s okay. Some pieces will naturally settle as the cake bakes.
4. Add the Remaining Butter
Cut the remaining butter into small pieces or pats.
Scatter them evenly over the surface of the batter.
As the cake bakes, the butter melts into the top, helping create the rich, golden finish that makes this simple dessert so delicious.
5. Bake
Place the dish in the preheated oven.
Bake for approximately 35–40 minutes, or until the top is golden brown and the cake looks set.
The edges should be lightly browned, while the fruit may remain juicy and bubbly.
The linked recipe specifies approximately 35–40 minutes at 350°F.
6. Cool Slightly
Remove the cake from the oven and let it cool for at least 10 minutes.
This gives the juices a chance to settle and makes the cake easier to serve.
Don’t worry if it looks a little softer than a traditional cake. Cuppa Cuppa Cake is supposed to have a moist, cobbler-like texture.
7. Serve Warm
Spoon the warm cake into bowls and top each serving with a generous scoop of vanilla ice cream.
You can also serve it with freshly whipped cream.
The contrast between the warm fruit cake and cold, creamy ice cream is one of the best parts of this dessert.
Tips for the Best Cuppa Cuppa Cake
Use self-rising flour
This is one of the most important details. Regular all-purpose flour without added leavening won’t give you the same result.
Don’t drain the fruit
The juice isn’t optional. It’s what brings the simple flour-and-sugar mixture together and contributes to the moist texture.
Grease the pan generously
Butter helps prevent sticking and adds richness around the edges and bottom.
Don’t overmix
Stir the ingredients just until combined. Overmixing can make the cake less tender.
Don’t expect a traditional cake texture
This dessert is moist and spoonable, somewhere between a cake and a cobbler. The fruit can sink toward the bottom as it bakes, which is completely normal.
Serve it warm
Although it can be eaten after cooling, it’s especially delicious while still warm from the oven with vanilla ice cream.
Delicious Variations
Peach Cuppa Cake
Replace the fruit cocktail with canned peaches and some of their juice. Cut larger peach slices into bite-sized pieces first.
Pear Cuppa Cake
Use canned pears with their juice for a delicate, naturally sweet version.
Cherry Cuppa Cake
Use a mixture of canned cherries and peaches for extra fruit flavor.
Cinnamon Cuppa Cake
Add ½ teaspoon ground cinnamon to the flour and sugar mixture for a warm, cozy flavor.
Coconut Version
Add ½ cup shredded coconut to the batter before baking.
Pecan Cuppa Cake
Sprinkle ½ cup chopped pecans over the batter before adding the butter.
Brown Sugar Version
Replace part of the granulated sugar with light brown sugar for a deeper caramel flavor.
What to Serve With Cuppa Cuppa Cake
This cake is delicious on its own, but a few toppings can turn it into an especially indulgent dessert.
Try it with:
- Vanilla ice cream
- Whipped cream
- Caramel sauce
- Powdered sugar
- Toasted pecans
- Fresh berries
- A drizzle of honey
- Cinnamon
For a simple presentation, place a warm serving of cake in a bowl and add one large scoop of vanilla ice cream right on top.
Make-Ahead Instructions
Cuppa Cuppa Cake is best served warm and fresh, but you can prepare it ahead of time.
Bake the cake, allow it to cool, and cover it tightly.
When ready to serve, reheat individual portions in the microwave for about 20–30 seconds, or warm the entire dish gently in a low oven.
If you’re making it for guests, baking it shortly before serving gives you the best texture.
Storage
Cover leftover cake and refrigerate for up to 3–4 days.
The texture will become softer as it sits because the fruit juices continue to soak into the cake.
Reheat individual portions gently in the microwave or in a low oven.
Serve with fresh vanilla ice cream to bring back that warm-and-cold contrast.
Frequently Asked Questions
Why is it called Cuppa Cuppa Cake?
The name refers to its famously simple measurements: a cup of flour, a cup of sugar, and a cup of fruit cocktail with its juice. The recipe became widely associated with Dolly Parton’s character Truvy in the movie Steel Magnolias.
Can I use regular flour?
Not by itself. Use self-rising flour or make your own by combining all-purpose flour with baking powder and salt.
Should I drain the fruit cocktail?
No. Use the fruit cocktail with its juice. The liquid is essential to the batter.
Can I use canned peaches instead?
Yes. Peaches, pears, and other canned fruits can be used as variations as long as you retain enough of their juice to provide moisture.
Can I double the recipe?
Yes. A doubled batch can be baked in a larger baking dish, such as a 9×13-inch pan. You may need a little additional baking time.
Is Cuppa Cuppa Cake supposed to be gooey?
It’s supposed to be moist and somewhat cobbler-like rather than dry and fluffy like a conventional layer cake. The fruit and juice naturally give it a soft texture.
Final Thoughts
Cuppa Cuppa Cake is the perfect example of why some of the simplest recipes become family favorites. With just self-rising flour, sugar, fruit cocktail, and butter, you can create a warm, fruity dessert with a golden top and wonderfully comforting texture.
Serve it warm with vanilla ice cream, and you’ll understand why this nostalgic recipe has remained so memorable. It’s quick enough for a last-minute dessert, simple enough to make from memory, and delicious enough to deserve a permanent place in your recipe collection.

